A Complete User Guide for Ultrasonic Cleaning
Ultrasonic cleaning is a process that uses high-frequency sound waves to remove dirt, grime, and other contaminants from the surface of an object. The process works by generating high-frequency sound waves in a cleaning solution, typically water, that cause microscopic bubbles to form and collapse. The rapid formation and collapse of these bubbles, called cavitation, creates high-pressure waves that remove dirt and contaminants from the surface of the object being cleaned. The sound waves also help to agitate the cleaning solution, further aiding in the removal of contaminants. The object or part you are cleaning is typically immersed in the cleaning solution and the ultrasonic waves are generated by an ultrasonic transducer. The process is commonly used in industrial settings for cleaning complex and hard-to-reach parts as well as laboratories for cleaning medical instruments.
This post will go over:
- Tips for ultrasonic cleaning
- Ultrasonic frequencies
- What can you clean with ultrasonics?
- What are the advantages of ultrasonics?
- How to choose the right ultrasonic cleaning detergent?
- Comparing ultrasonic cleaners and spray washers
- Steps to sizing out ultrasonics cleaners
- Steps to maintaining ultrasonic cleaners
Tips for ultrasonic cleaning
Here are some tips for ultrasonic cleaning:
- Determine the right frequency: The frequency of the ultrasonic waves should be chosen based on the type of material being cleaned. Generally, lower frequency waves are better for heavy-duty cleaning and higher frequency waves are better for delicate cleaning.
- Choose the right cleaning solution: The cleaning solution should be chosen based on the type of material being cleaned and the type of contamination. A common solution is a mixture of water and detergent, but other specialized solutions may be needed for specific materials or contaminants.
- Determine the appropriate cleaning time: The cleaning time should be determined based on the type of material being cleaned, the type of contamination, and the size of the parts being cleaned. Generally, a cleaning time of 10-30 minutes is appropriate, but this can vary depending on the specific cleaning situation.
- Properly prepare the parts: The parts to be cleaned should be thoroughly rinsed to remove any loose dirt or debris before being placed in the ultrasonic cleaning tank.
- Monitor the cleaning process: The cleaning process should be monitored to ensure that the parts are being cleaned properly and to avoid damage to the parts.
- Drain and rinse the tank: After the cleaning process is complete, the cleaning solution should be drained from the tank and the parts should be rinsed with water to remove any remaining cleaning solution.
- Store the cleaning solution properly: The cleaning solution should be stored in a closed container and should be replaced periodically to maintain its cleaning effectiveness.
Ultrasonic frequencies
Ultrasonic cleaning frequencies refer to the number of sound waves (vibrations) that are produced per second by an ultrasonic cleaner. The most common frequencies used for ultrasonic cleaning are 25 kHz, 40 kHz and 68 kHz. Each frequency has its own set of advantages and disadvantages:
- 25 kHz – This is a lower frequency but produces the largest bubble, commonly used for larger and tougher cleaning tasks, such as removing rust, paint, or heavy deposits from large parts and surfaces. Typically not safe on softer metals such as aluminum.
- 40 kHz: This frequency is suitable for cleaning delicate items with intricate parts and for removing light to medium contaminants.
- 68 kHz: This frequency produces tiniest bubble size which makes it the best for cleaning items with larger surface areas and for removing complex geometries.
The frequency chosen depends on the type of cleaning required, the size and shape of the item to be cleaned, and the type of contaminants to be removed. In general, higher frequencies provide better cleaning results but may be less effective on large items or heavy contaminants.
What can you clean with ultrasonics?

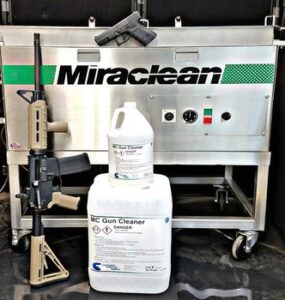
Ultrasonic Gun Cleaning System with Detergent
- Firearms
- Medical and dental instruments
- Jewelry
- Aerospace
- Machined parts
- Electronic devices
- Mechanical parts
- Automotive parts
- Many other delicate or hard to reach items
What are the advantages of using an ultrasonic cleaner?
Ultrasonic cleaners have several advantages:
- Efficiency: Ultrasonic cleaners use high-frequency sound waves to create microscopic bubbles that rapidly agitate and remove dirt, grime, and other contaminants from the surface of an object. This makes ultrasonic cleaning much more effective and efficient than traditional cleaning methods.
- Precision: The high-frequency sound waves of an ultrasonic cleaner allow for precise and thorough cleaning, even in hard-to-reach places and tight spaces.
- Versatility: Ultrasonic cleaners can be used to clean a wide range of materials, including metals, plastics, ceramics, glass, and more.
- Gentle cleaning: Unlike harsh chemical cleaners or abrasive scrubbing, ultrasonic cleaning is gentle and won’t damage delicate objects or surfaces.
- Environmental friendliness: Ultrasonic cleaning uses only water and mild detergents, making it an environmentally friendly alternative to chemical-based cleaning methods.
How to choose the right ultrasonic cleaning detergent?

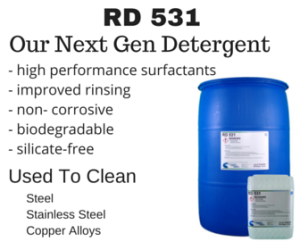
High performance detergents are crucial to ultrasonic cleaning
To choose a cleaning detergent for ultrasonic cleaners, consider the following factors:
- Type of material to be cleaned: The type of material to be cleaned will determine the type of cleaning solution to use. For example, aluminum should not be cleaned with an alkaline solution.
- Contaminants to be removed: Different contaminants require different cleaning solutions. For example, oil-based contaminants are best removed with a solution that contains degreasers.
- Ultrasonic cleaner specifications: Check the specifications of your ultrasonic cleaner to determine the appropriate cleaning solution to use. Some ultrasonic cleaners require specific solutions, such as water-based or solvent-based.
- Environmental concerns: Consider the environmental impact of the cleaning solution you choose. Some cleaning solutions may contain harmful chemicals that can harm the environment or pose a health risk.
- The amount of ultrasonic cleaning solution to use depends on several factors, including the size of the cleaning tank, the type of solution, and the type of dirt or contamination to be removed
Comparing ultrasonic cleaners and spray washers
- Ultrasonic cleaners and spray washers are two different cleaning technologies that are used to remove dirt, grime, and contaminants from a variety of surfaces and objects.
- Ultrasonic cleaners use high-frequency sound waves to agitate and remove dirt and grime from surfaces. The sound waves generate tiny bubbles in a cleaning solution, which collapse and create pressure waves that remove dirt and contaminants from the surface being cleaned. Ultrasonic cleaners are best for cleaning delicate or intricate objects, such as jewelry or dental instruments, as they do not physically scrub the surface and can clean hard-to-reach areas.
- Spray washers, on the other hand, use high-pressure sprays of cleaning solution to physically remove dirt and grime from surfaces. The cleaning solution is usually combined with detergent to improve its cleaning ability. Spray washers are better for cleaning large, heavy, or tough-to-clean objects, such as engines or machinery, as they provide a more physical cleaning action.
Both ultrasonic cleaners and spray washers have their own advantages and disadvantages, and the best option depends on the specific cleaning needs and the type of object being cleaned.
Steps to sizing out an ultrasonic cleaning process
Sizing an ultrasonic cleaner involves determining the appropriate volume and tank dimensions for the parts and items you want to clean.
Here are the steps to follow:
- Determine the volume of the ultrasonic cleaner: You need to know how much liquid you need to cover the items you want to clean. This will depend on the size and number of parts you want to clean at once.
- Measure the dimensions of the items: Determine the dimensions of the largest item you want to clean. This will help you determine the minimum size of the ultrasonic tank you need to accommodate it.
- Consider the depth of the tank: Ultrasonic cleaners work best when the liquid covers the items to be cleaned by at least 1 inch. Consider the depth of the tank to ensure that you have enough liquid to clean your items effectively.
- Determine the tank shape: Some ultrasonic cleaners have rectangular tanks, while others have cylindrical tanks. The shape of the tank will affect how efficiently the ultrasonic waves are able to clean the items.
- Choose the right frequency: Different ultrasonic cleaners operate at different frequencies. For most cleaning applications, a frequency of 40kHz is sufficient. However, for cleaning small items or for removing stubborn contaminants, you may need a higher frequency.
- Determine the power output: The power output of an ultrasonic cleaner is measured in watts. The higher the power output, the more effectively the ultrasonic waves will clean your items.
- Consider additional features: Some ultrasonic cleaners come with additional features, such as temperature control, adjustable timers, pump and filter systems, and digital displays. Consider these features when sizing your ultrasonic cleaner to determine what will work best for your specific cleaning needs.
By considering these factors, you can size an ultrasonic cleaner that will effectively clean your items and meet your specific cleaning requirements. If you need help in sizing out for you application, our equipment division, Miraclean, will be happy to assist.
What are the steps to maintain ultrasonic cleaning systems?
To maintain ultrasonic cleaners, follow these steps:
- Clean the tank regularly: Empty the tank and wash it with a mild detergent solution after each use. Rinse it thoroughly with water and dry it before using it again.
- Check the ultrasonic generator: Make sure the generator is functioning properly and producing the correct frequency and power output. If not, have it serviced or replaced.
- Replace the cleaning solution: If the cleaning solution becomes dirty or contains debris, replace it with fresh solution.
- Check the transducers: Inspect the transducers for damage, such as cracks or chips. If damaged, have them repaired or replaced.
- Store properly: When not in use, store the ultrasonic cleaner in a cool, dry place, away from direct sunlight and moisture.
- Follow the manufacturer’s instructions: Always follow the manufacturer’s instructions for cleaning, maintenance, and operation of the ultrasonic cleaner.
By following these steps, you can help ensure that your ultrasonic cleaner operates effectively and efficiently for years to come.
Want to know more about cleaning with ultrasonic cleaners? Contact the specialists at our equipment division, Miraclean Cleaning Systems, or our chemical division, Chautauqua Chemicals Co., Inc. or find out more at 716-763-4114 or email us at info@cchemco.com.

